Weebly is an eCommerce service that lets you start your own online business, whether it be from scratch or taking your in-person business online. Their powerful tools make it easy to build a professional site and grow your business with integrated marketing and advanced analytics.
cPanel is a popular control dashboard that helps you manage your web hosting server using a very friendly graphical interface. It’s especially popular with shared hosts, where it’s the solution provided by most affordable hosting providers.
When first accessing an email account through a desktop most of the customers would use and email application like “Outlook” or “Thunderbird”. To use your email with these applications you must first set it up. With this guide, you can set this up by following these steps.
HOW TO START
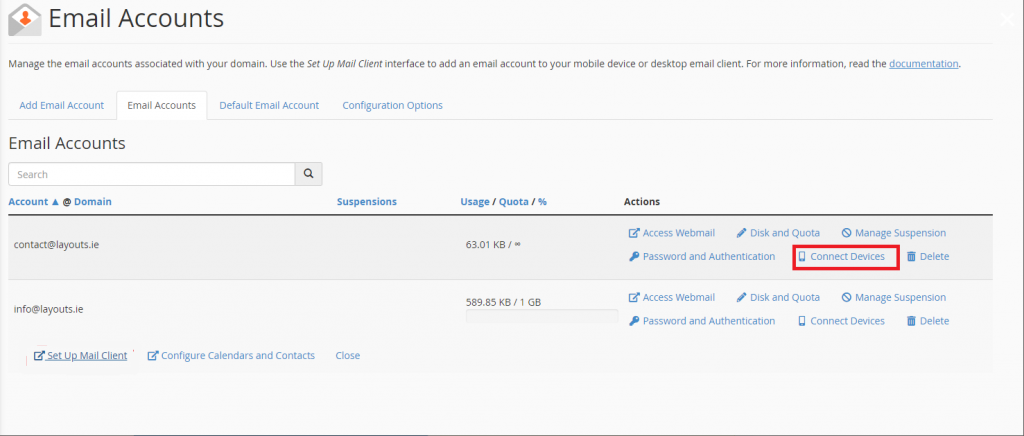
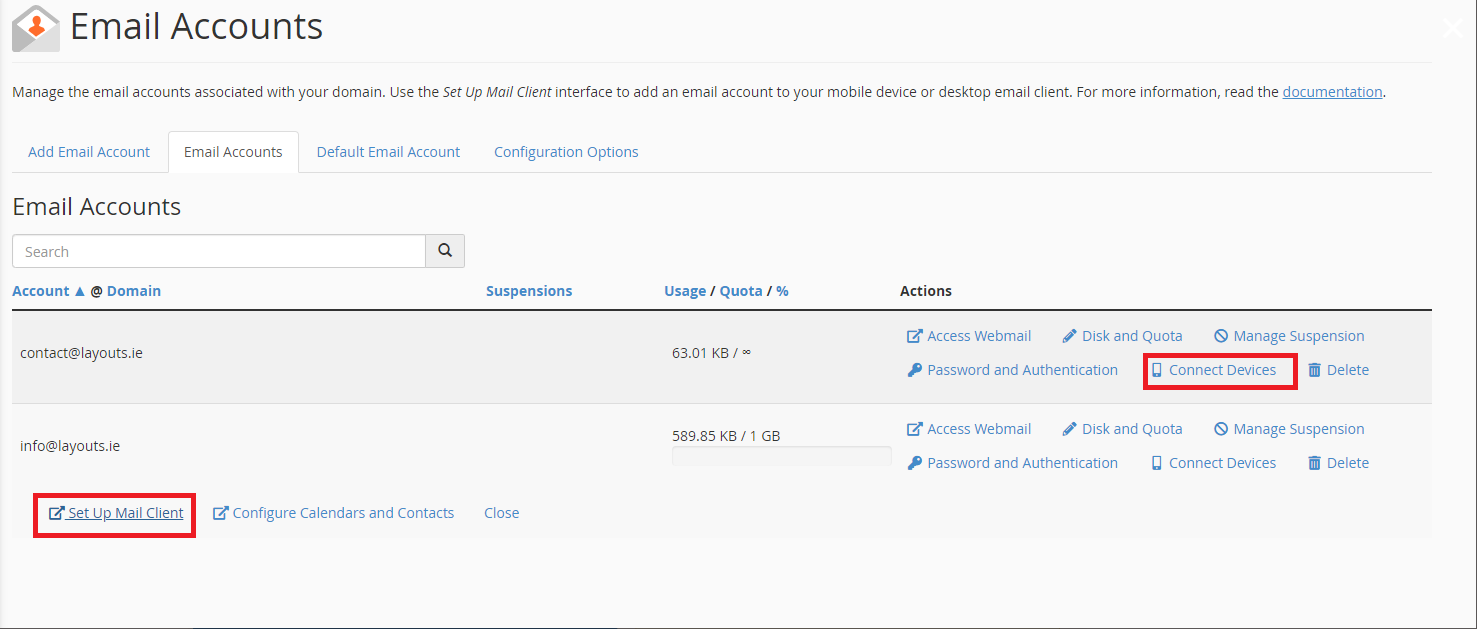
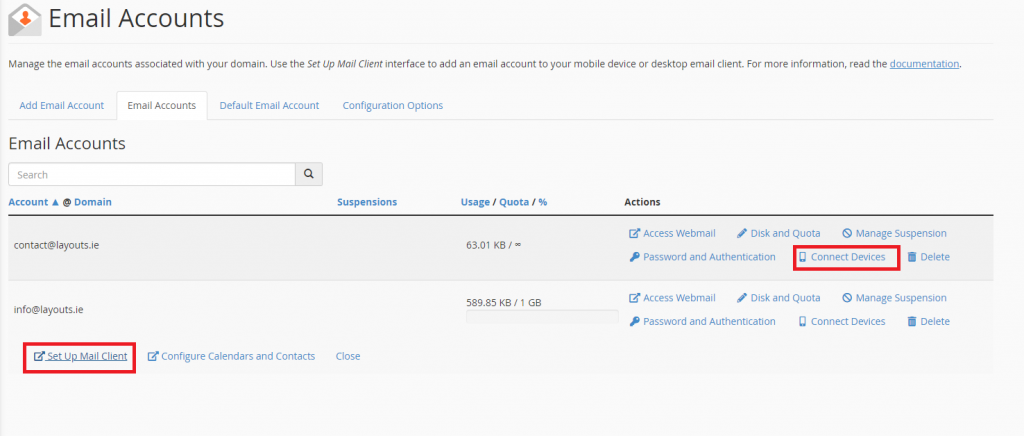
1/ Please log in into your client area at: Client Area 2/ Go to ==> ‘Services’ ==> ‘My Services’ 3/ Click on your hosting plan 4/ Go to cPanel (top-left corner) 5/ Go to e-mail accounts (Click the e-mail accounts icon on the bottom) You should now see your email accounts (if any have been created). Select the email account to set up by clicking ‘Connect devices’
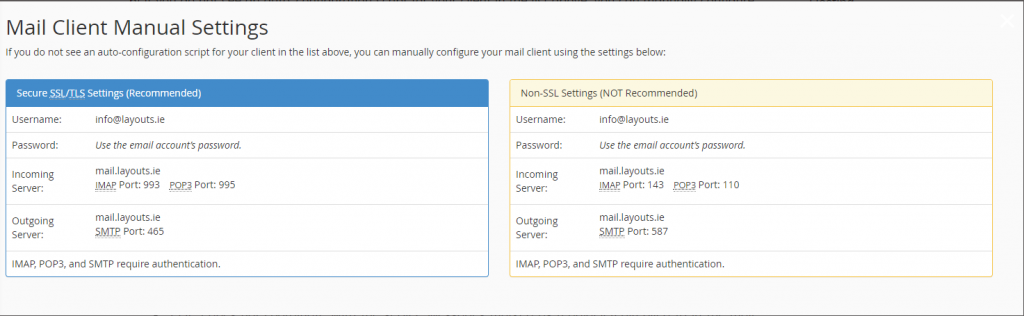
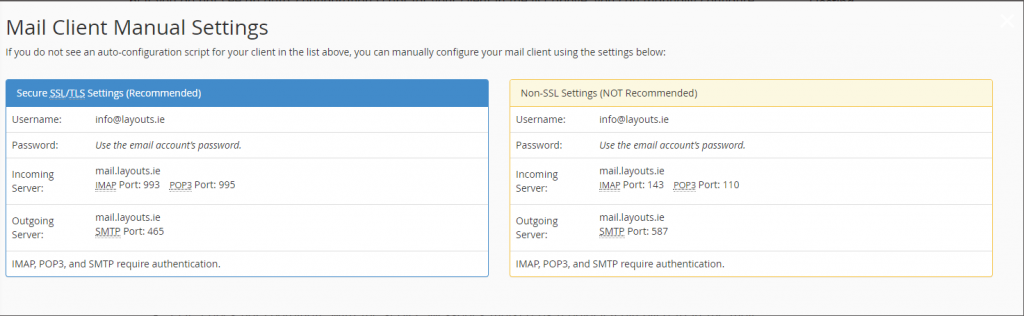
If an auto config script does not appear for your client in the list above, you can do this manually by using the following steps below:
Notes (before we begin): IMAP email access coordinates between the server and your mail application. Messages that have been read/deleted/replied to will show up as such, both on the server and in the mail application. POP3 does not coordinate with the server. Messages marked as read/deleted/replied to in the mail application will not show up as such on the server. This means that future mail downloads with POP3 will show all messages as unread. Outgoing mail is sent using SMTP.
We recommend using POP3 over SSL/TLS or IMAP over SSL/TLS since they provide increased security for your interactions with the remote mail server.
SECURE OR NOT SECURE
Secure SSL/TLS settings are recommended, but if the verification with Outlook isn’t successful, please do not use SLL recommended settings (as shown in the example below)
HOW DO I ENABLE SMTP AUTHENTICATION?
An example: Microsoft Outlook® 2019 (PC)
Run Outlook
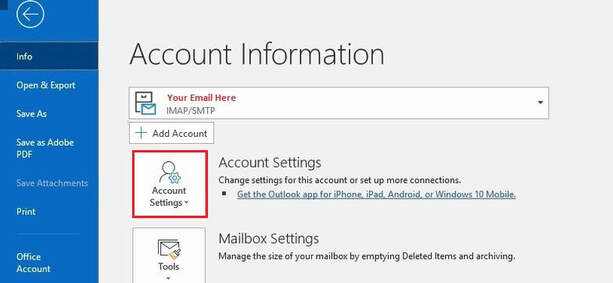
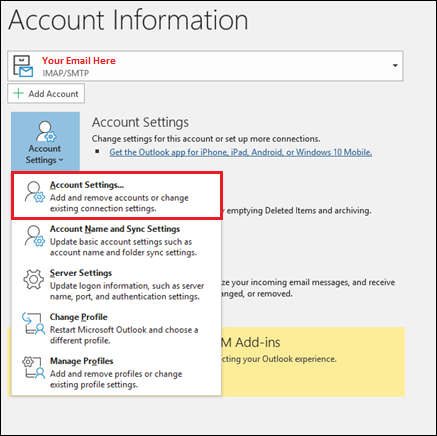
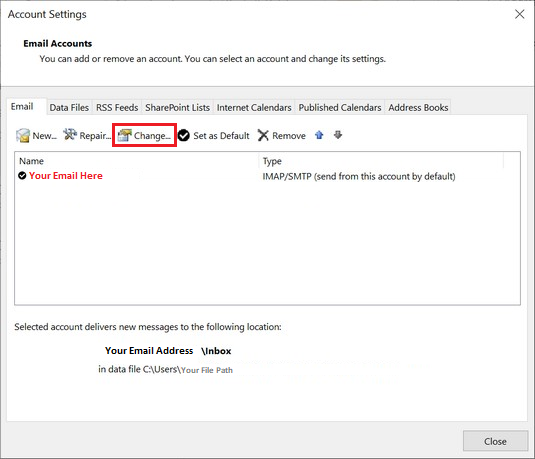
Go to ‘File ==> ‘Account Settings’
Select the account you are looking to modify & click ‘change’
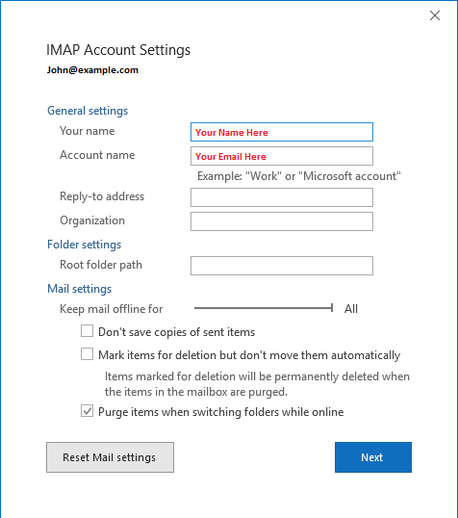
You can change any settings you wish in the Accounts Dialog Box:
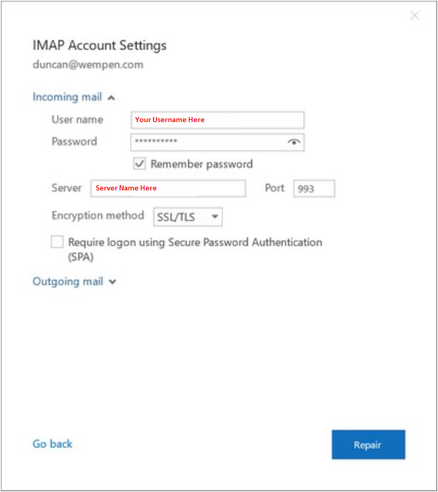
In order to change the mail server settings, the repair command must be used as follows: From the Account Settings dialog box, click on the account and then click Repair. Click ‘Advanced Options’ Click on the ‘Let me repair my account manually’ check box. After that click on ‘Repair’ Lastly, change the incoming mail server settings as follows:
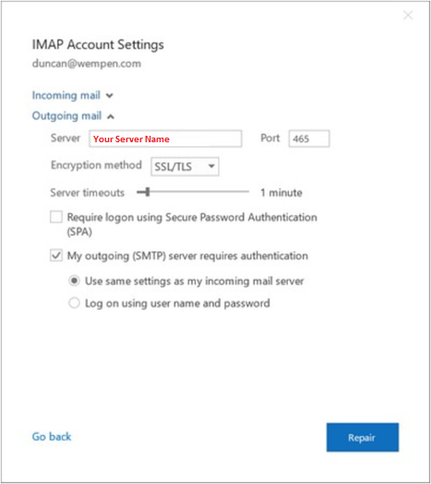
Then click the blue ‘Outgoing Mail’ drop-down & make changes to them as needed:
(Please ensure the “Server” is the same as the server you received in the Blue box at the beginning of this tutorial, you can find this box in cPanel as mentioned previously. Ensure that the “Port” is also the same as the one in the Blue box.
Finally, select ‘Repair’ to apply the changes, and then click ‘done’
When you first access an email account through a desktop most of the customers would use and email application just like “Outlook” or “Thunderbird”. In order for you to use your email with these applications you need to set it up. With this guide, I will show you step by step how to set it up for you.
HOW TO START
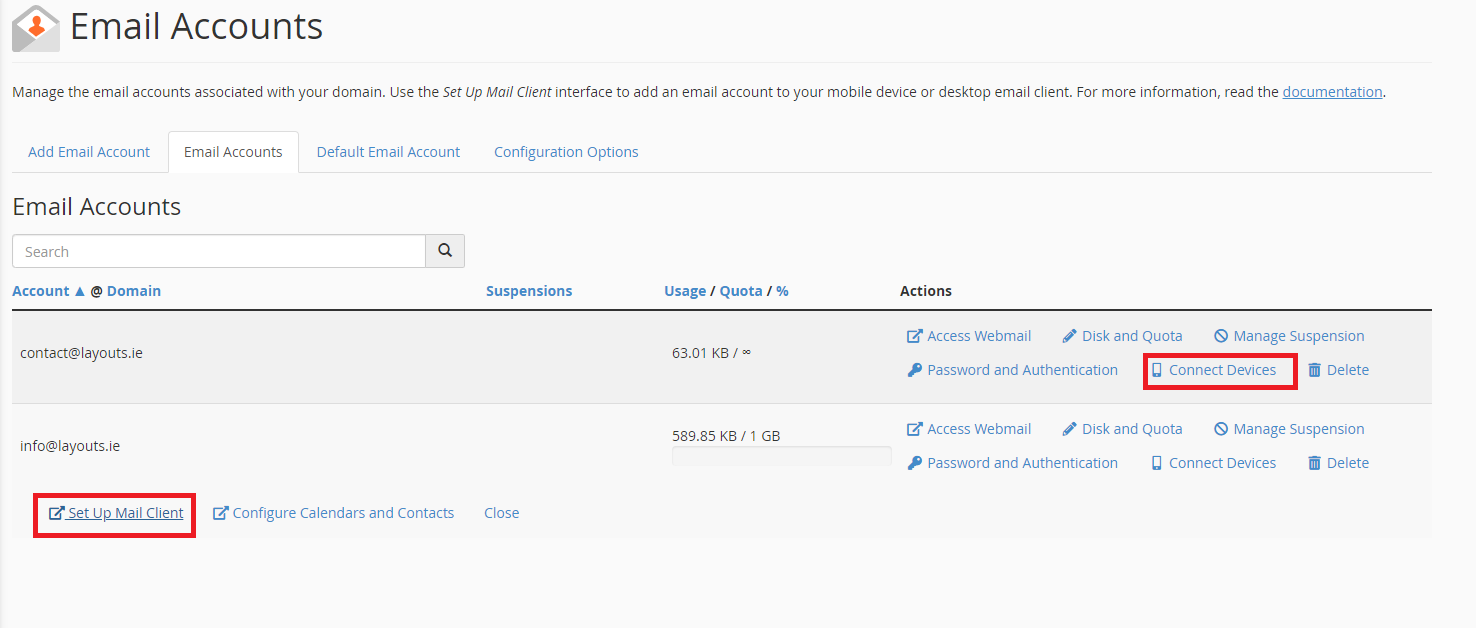
1/ Please log into your client area. 2/ At the top of the client area, where the blue bar runs across, click into “Services” -> “My Services” 3/ Click into your designated Hosting Plan. 4/ Click into cPanel (Top-left hand corner). 5/ Go to Email Accounts (Click the email accounts icon in the icon menu). At this stage you should see your email accounts, unless you have no email accounts then you can create one from there on. When you find the email account you wish to connect to the email app, click “Connect Devices”, followed by “Set Up Mail Client”.
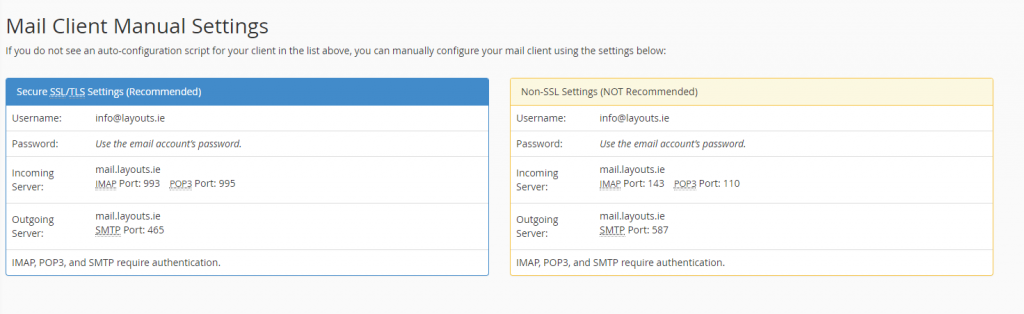
This should bring you into a page with “Mail Client Manual Settings”. You should have two boxes, one in Blue and the other one in Orange. The blue one should have the header “Secure SSL/TLS Settings (Recommended)”. For the set up we will be using the details in this box.
SOME IMPORTANT NOTES BEFORE WE BEGIN
IMAP email access coordinates between the server and your mail application. Messages that have been read/deleted/replied to will show up as such, both on the server and in the mail application. POP3 does not coordinate with the server. Messages marked as read/deleted/replied to in the mail application will not show up as such on the server. This means that future mail downloads with POP3 will show all messages as unread. Outgoing mail is sent using SMTP.
We recommend using POP3 over SSL/TLS or IMAP over SSL/TLS since they provide increased security for your interactions with the remote mail server. Important: This only applies to customers hosted on cPanel.
SECURE OR NOT SECURE? Secure SSL/TLS settings are recommended, but if the verification with Outlook isn’t successful, please use the not recommended settings.
HOW DO I ENABLE SMTP AUTHENTICATION?
An example: Microsoft Outlook® 2016 (PC)
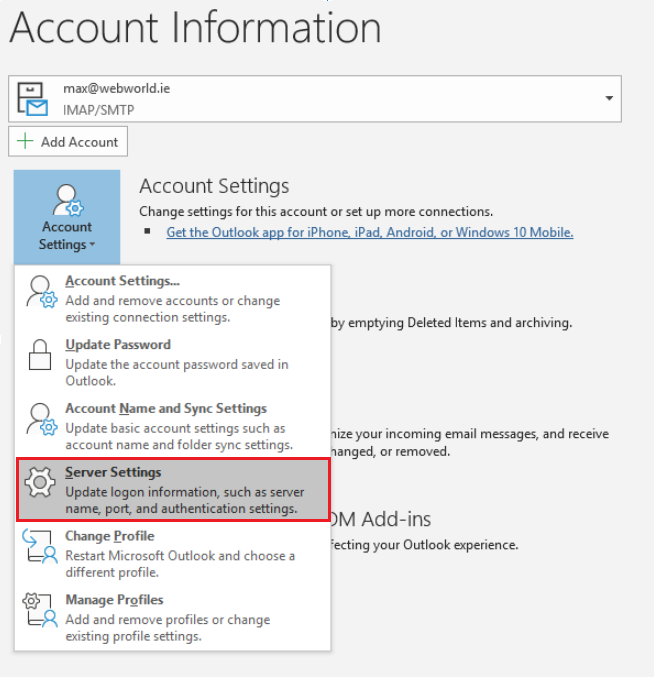
From the “File” menu, choose “Account Settings”, click once and then click onto “Server Settings”.
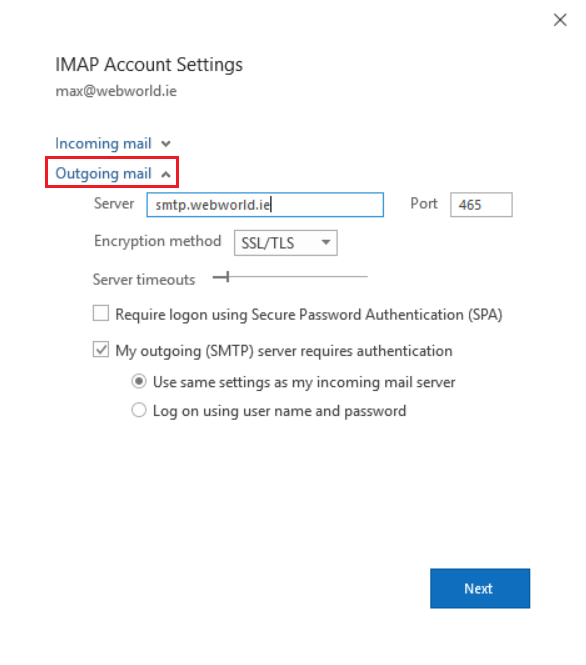
Click “Outgoing mail” in blue font and a menu should appear.
Make sure that “My outgoing (SMTP) server requires authentication” box is ticked like in the picture above. Also be sure that the “Server” is the same as the one that was given to you in the Blue box at the beginning of this tutorial, you can find this box in cPanel as mentioned previously. Make sure that the “Port” is also the same as the one in the Blue box.
When you access an email account through a desktop email application email application will require specific information about your email account. You can use the auto-configure options to attempt to automatically configure your email application. If the available options are not compatible with your application, you will need to use the manual settings information.
HOW TO START
1/ Please log in into your client area at: 2/ Go to ==> Services 3/ Click the hosting plan header 4/ Go to cPanel (top-left corner) 5/ Go to e-mail accounts (Click the e-mail accounts icon on the bottom)
When you see all your email accounts, select the correct one and click: “Connect devices” link, and “Set Up Mail Client”
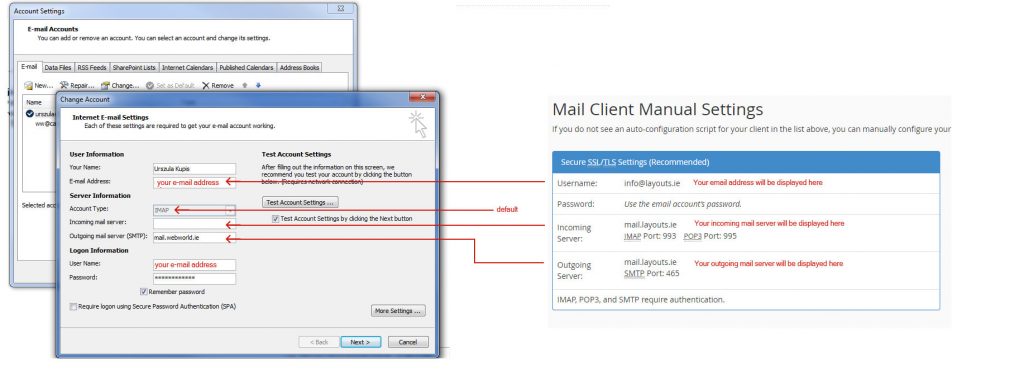
6/ If you do not see an auto-configuration script for your client in the list above, you can manually configure your mail client using the settings below (please see an example below) :
Notes: IMAP email access coordinates between the server and your mail application. Messages that have been read/deleted/replied to will show up as such, both on the server and in the mail application. POP3 does not coordinate with the server. Messages marked as read/deleted/replied to in the mail application will not show up as such on the server. This means that future mail downloads with POP3 will show all messages as unread. Outgoing mail is sent using SMTP. We recommend using POP3 over SSL/TLS or IMAP over SSL/TLS since they provide increased security for your interactions with the remote mail server.
SECURE/ NOT SECURE?
Secure SSL/TLS settings are recommended, but if the verification with Outlook isn’t successful, please use NOT SLL settings (an example will be provided below)
HOW DO I ENABLE SMTP AUTHENTICATION?
An example: Microsoft Outlook® 2010 (PC)
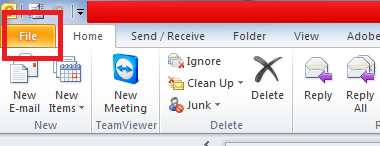
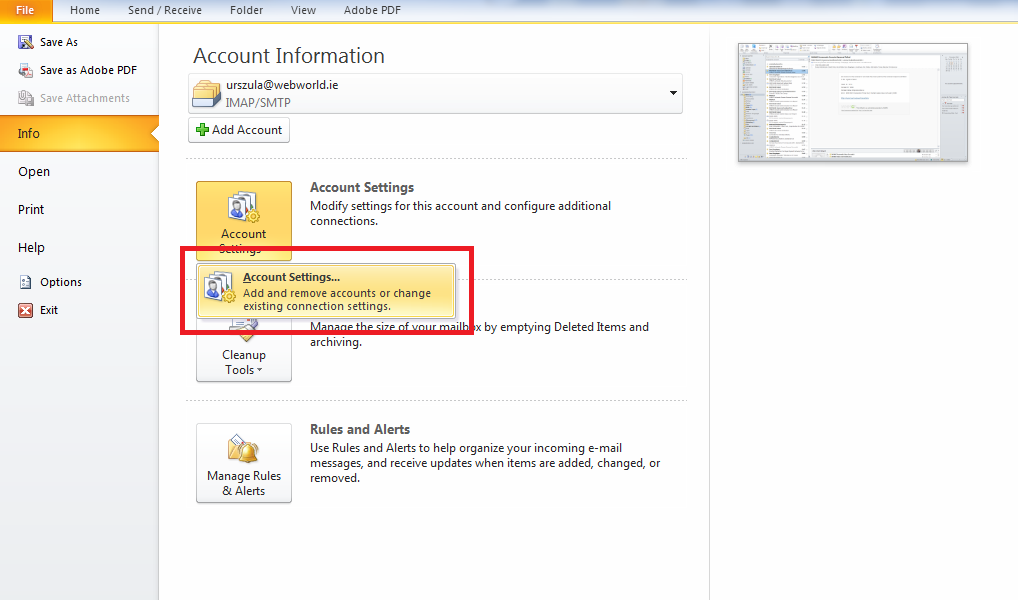
From the File menu, choose “Account Settings”
Account settings: Click once to display a pop-up window at the bottom:
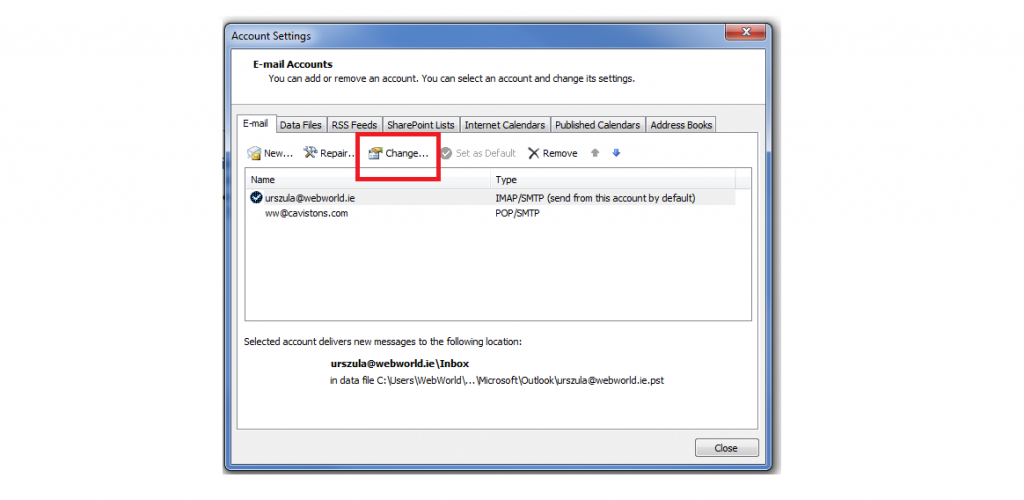
Select your Email account and click the “Change” button above:
Please check/enter all details from
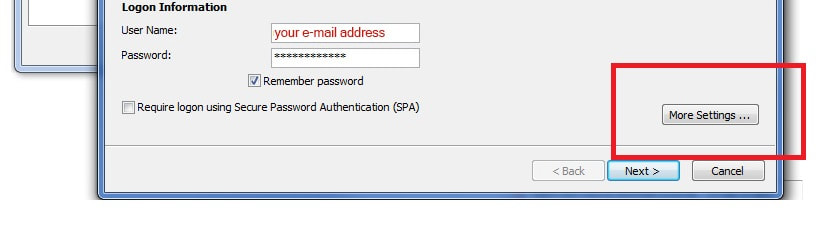
Please click “more settings”
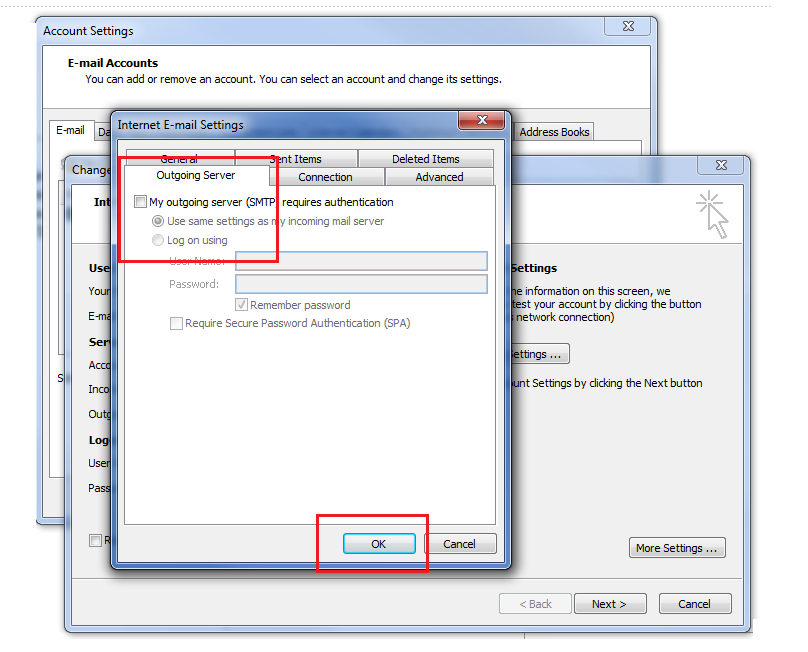
Please go to “Outgoing Mail Server” and ensure that the box “My outgoing server (SMTP) requires authentication” is unchecked
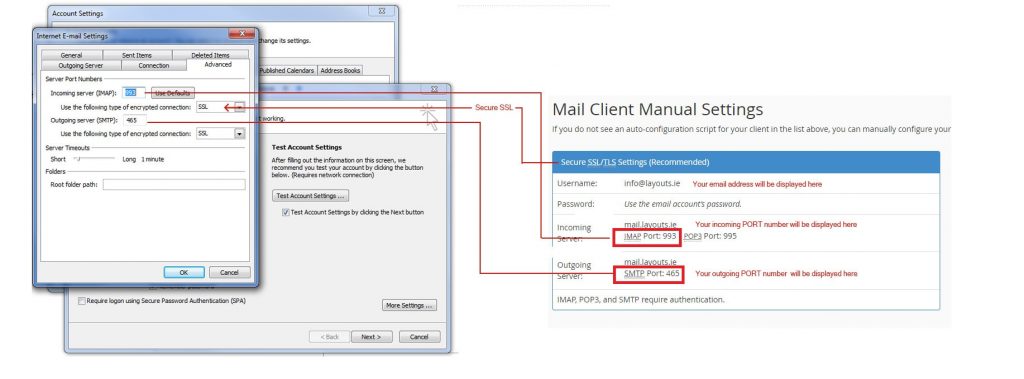
In the “Advanced” section, please set up PORT numbers:
Notes: Ports numbers are depends from the authentication settings. Let’s use the port numbers for secure SSL/TSL or Non-SSL settings EMAIL SOFTWARE YOU CAN SET UP TO ACCESS YOUR E-MAIL ON YOUR PC & MAC Email software you can set up to access your e-mail on your PC Microsoft Outlook®; Express (PC) Windows® Mail (PC) Microsoft Outlook® 2010 (PC) Outlook® 2007 (PC) Microsoft Outlook® 2003 and 2002/XP (PC) Outlook® 2000 and Outlook® 98 (PC) Eudora® 6.x (PC) Netscape Messenger® 7.x (PC) Netscape Messenger® 4.x (PC)
Email software you can set up to access your e-mail on your Mac: Mail for OS X (Mac) Eudora 6.x (Mac) Microsoft Outlook Express for OS 9 (Mac) Mozilla Thunderbird
If you have any questions, or if you need more information, do not hesitate to contact us please: support@webworld.ie
How to set up Outlook on Windows with different versions.
When you first access an email account through a desktop most of the customers would use and email application just like “Outlook” or “Thunderbird”. In order for you to use your email with these applications you need to set it up. With this guide, I will show you step by step how to set it up for you.
.io is a very short and cool extension to have for your domain. It is also perfect for you if you are starting a brand new business. It is a fantastic opportunity to use it to stand out, not many people nowadays own a .io domain!
We receive emails from our long term and new customers asking us the question, “Can you register a .ie domain for me”.
Of course we can register it for you, in fact, it’s so easy that all you need to do is send us 1 email with sufficient information and the rest is done! Please note below which information you need to send us in regards to the type of domain you are registering, please send all queries for registration to accounts@webworld.ie.
First, you need to let us know what the domain name will be, for example let’s go with this domain name: ilovetacotuesdays.ie. Quite complex, I know.
We check if it’s available, if it is, we generate an invoice for you for 1 year unless you want it to be renewed for more, the max we can do is 10 years.
After you pay the invoice we ask you to send an email with the information required.
Please refer to the information below and send the correct information to support@webworld.ie
BUSINESS PURPOSE
We will need only ONE of the following documents to see your connection with Ireland as a company or self-employed person.
RBN Number
CRO Number
VAT Number
TAX Certificate from Ireland’s Revenue Comission
NOTE: When providing a CRO Number, we additionally need a Staff Member’s details, that includes their Full Name, Phone Number, Address and email.
PERSONAL PURPOSE
We will need only ONE of the following documents to see your connection with Ireland with personal Identity.
Irish Passport
Irish / Northern Irish driver’s licence (showing an Irish Address)
Irish / Northern Irish Bank Statement (showing an Irish Address)
Official College ID (College has to be recognised by the Department of Education)
Public Service Card
After we receive your documents we can pass it onto IEDR (.ie Domain Registry) and it roughly takes 4 hours for your domain to go live! That’s how simple it is to register a .ie domain!
Name servers will be set to our default name servers, you can change them yourself using the client area or email us at support@webworld.ie and we will change them for you.
IEDR (.IE Domain Registry) updates their DNS Settings every 2 hours so it’s handy if you wish to change your DNS settings with them.
That’s it, you’re set and your domain is live!
REGISTERING OUTSIDE IRELAND?
If you are situated outside Ireland and are looking to register a .ie domain, all you need is a trade number for the Irish market and we will be able to register your .ie domain.
If you have any queries please email support@webworld.ie and we will get back to you as soon as possible.
You can also reach us at TEL: (01) 495 1112, Monday to Friday, 9:00am – 18:00pm
You might find yourself sitting in front of a computer, wondering, which one should I go for and which one will suit my needs the most? A VPS? Or a Dedicated Server? Find out by reading this article!
In this guide I will help you go through some information about DNS Propagation, also known more commonly as updating DNS Records.
This guide will be split into 4 segments:
What is DNS Propagation?
Why does it take long?
Are their other ways to pass DNS Propagation?
How do I check if DNS Propagation has been updated?
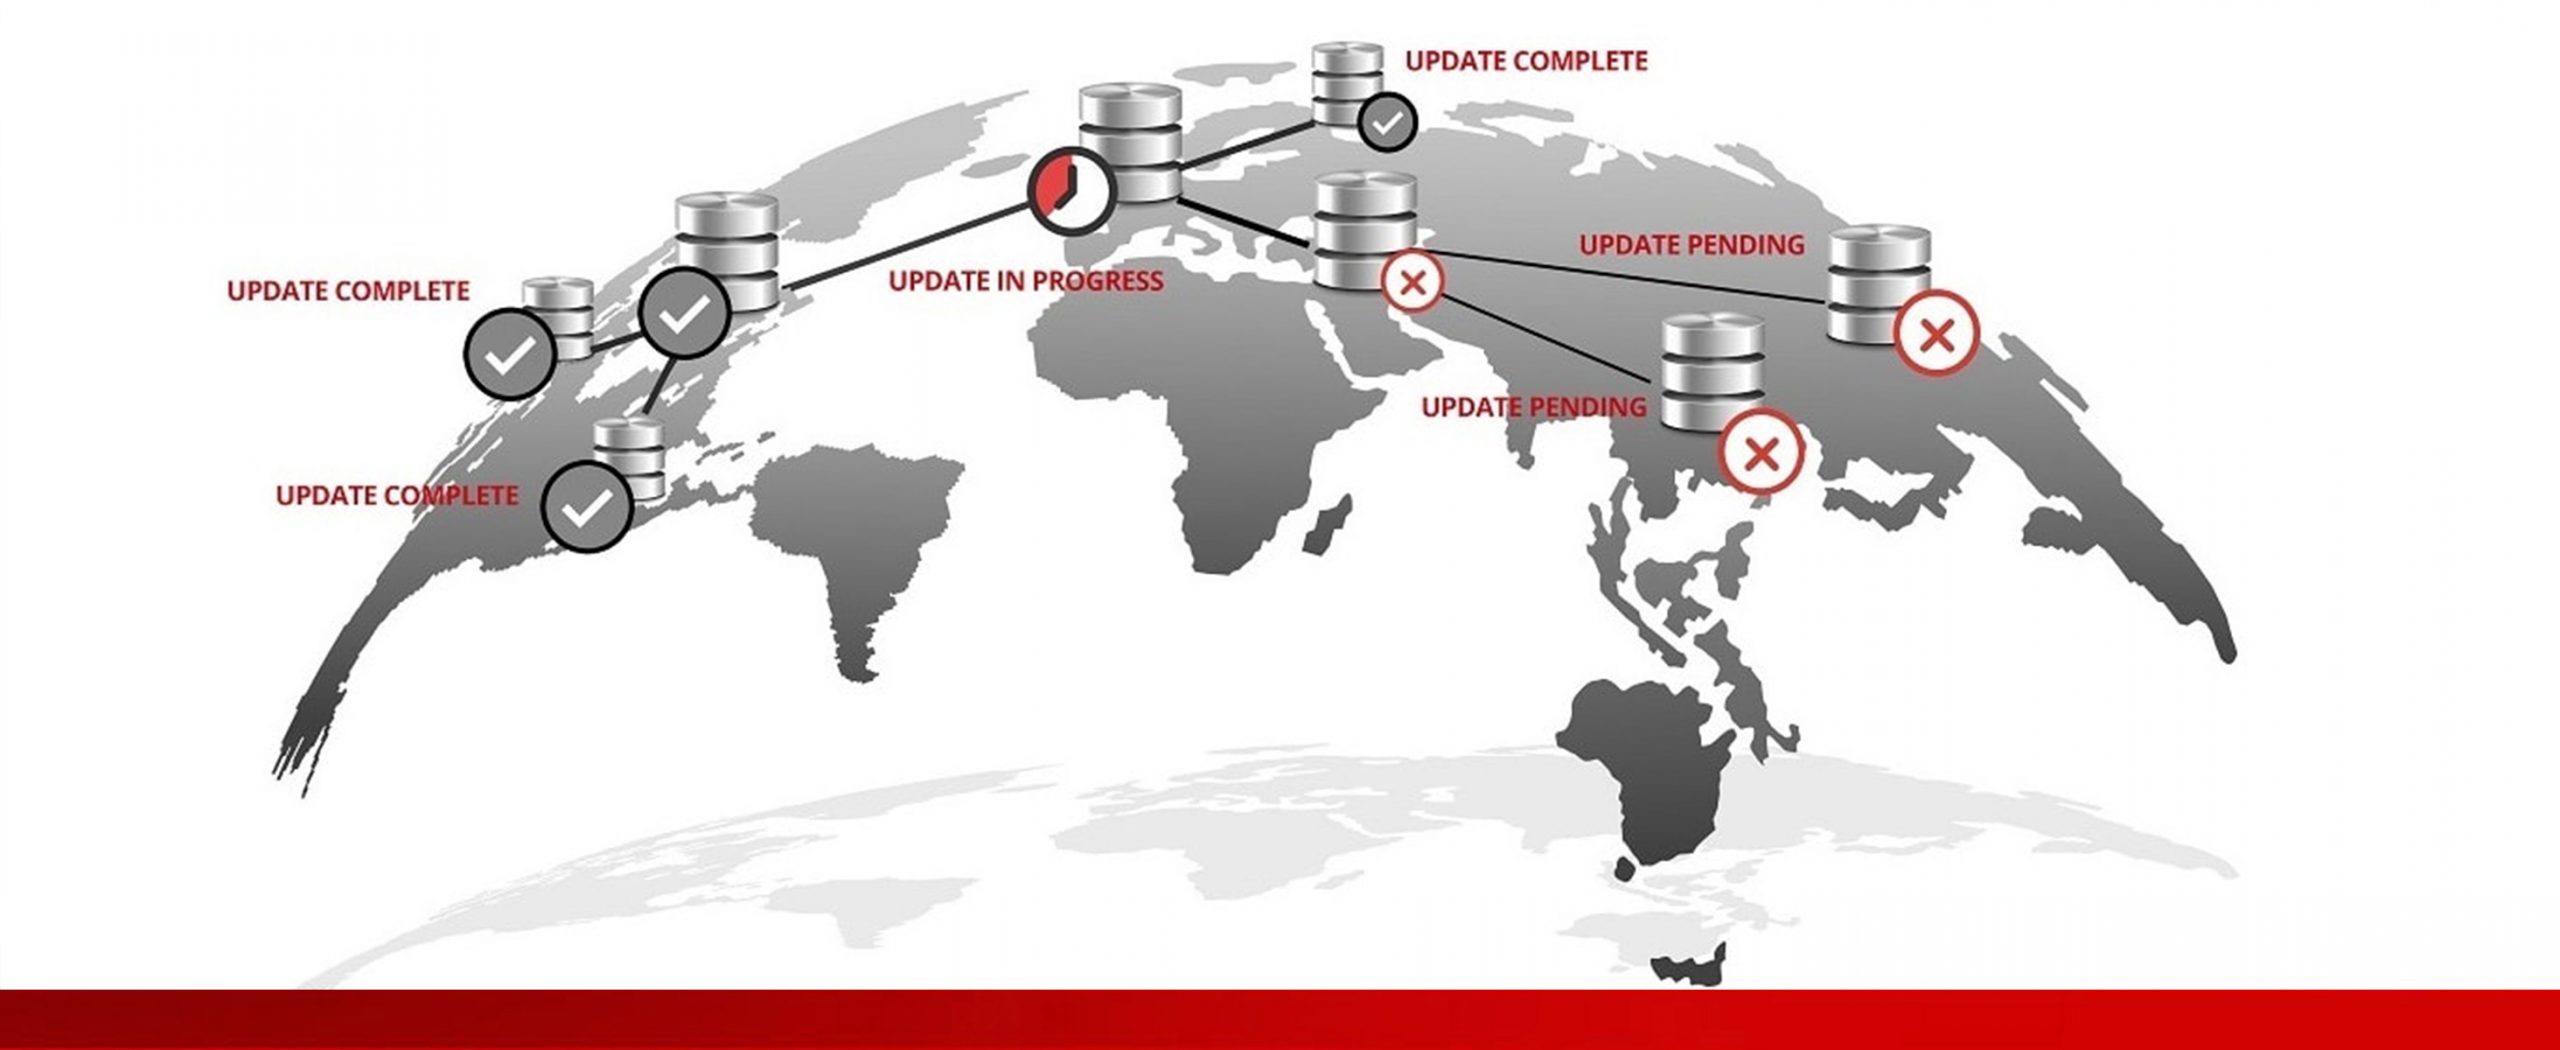
WHAT IS DNS PROPAGATION? DNS Propagation is the process of the period of time it takes for a domain’s Name Servers to update, this process usually takes 24-48 hours to complete before changing efffect. It can also be referred to ISP (Internet Service Provider) nodes. These nodes have to update all over the world with the new Nameservers you’ve set your domain to.
These nodes are all over the world and they all need to be updated individualy, that is why it takes at least 24 hours to update.
Also, DNS caches can still show the old website for different people viewing it, it all depends on their location on earth.
WHY DOES IT TAKE SO LONG? Let’s say you are currently living in Dublin, Ireland. You updated your name servers for a domain that’s hosted in Santa Monica, USA.
When anyone goes into the browser, and wishes to look up your website, they have to go through different servers in order to get to the server your website is stored at. People think that when you type in “Ilovetacotuesdayys.com”, the connection is instantly established between Dublin, Ireland and Santa Monica, USA. That is incorrect as it has to travel through many different connections, the path may vary each time.
This is the usual path:
Your browser -> Your computer -> Your Router -> Internet Provider -> Public DNS -> Domain Registrar -> DNS assigned to the domain you’re looking up -> Server on which the files are stored.
ARE THERE OTHER WAYS TO PASS DNS PROPAGATION? You can point the domain to the destined IP address by changing the A record. You also have to set TLL to a minimal amount. When the record has been updated you can change the nameservers for your domain.
This will result in your domain being resolved from your previous host from the places where the propagation has not been completed yet and to a new one from the places where it has already been completed. IN this way you will avoid downtime as both hosts will not show you your new updated website.
HOW DO I CHECK IF DNS PROPAGATION HAS BEEN COMPLETED? There really isn’t a way to tell when DNS records have been updated, there is websites that you can use to check but it all depends on your location in the world, your ISP and TTL applied to the domain. I have attached below a trustworthy DNS Checker that we sometimes use ourselves.
DNS Checkers work in a way that they provide a free check against any DNS Record in the world, they summarise the results they get and you receive it.
There is also another way of checking if DNS Propagation for yourself, for some people it might not be that simple to follow but I will try my best to explain it in this simple step by step. It consists of typing in commands into the command control panel.
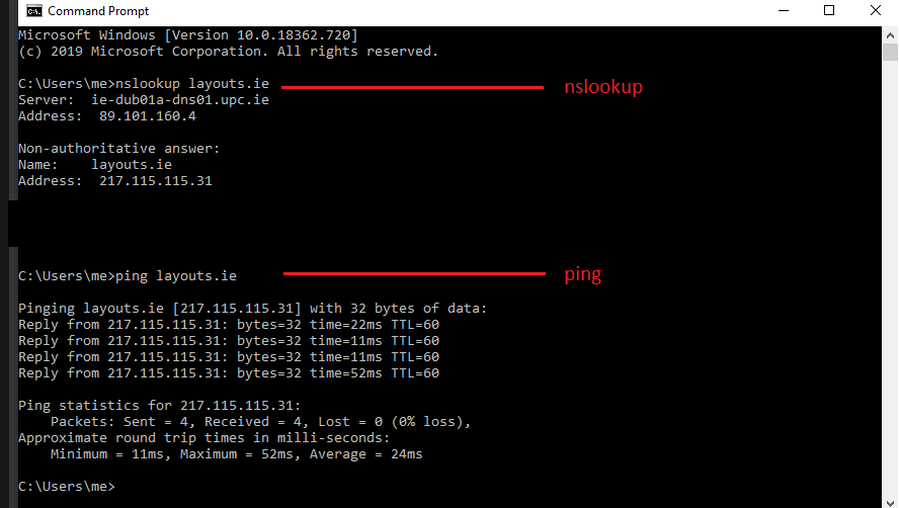
After typing in any of the commands below, you can tell if the propagation has been complete for you if the result of these commands is the new IP Address. If it is not the new IP Address, that means DNS Propagation hasn’t been complete for you.
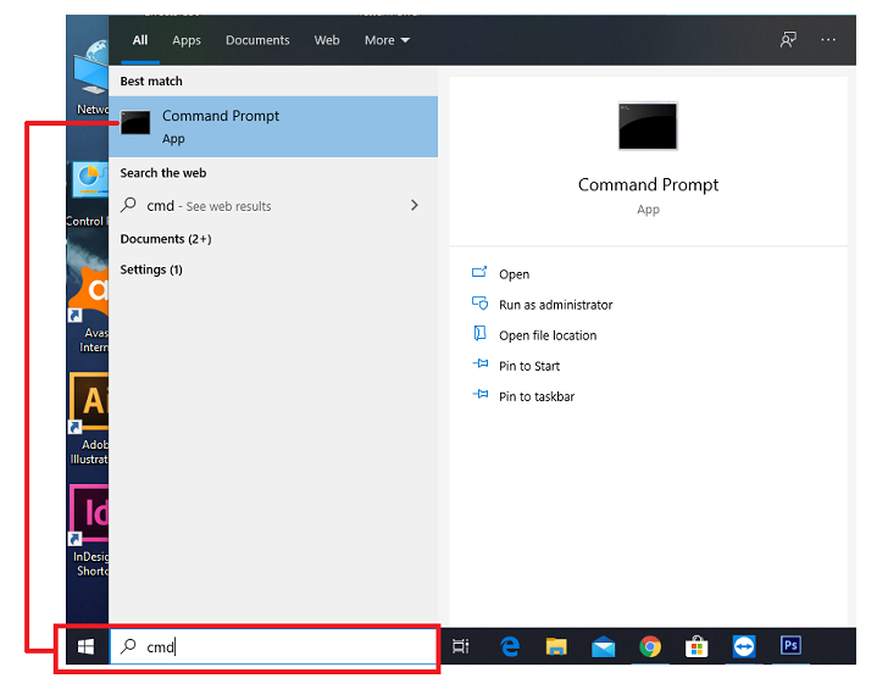
Click on the Start button and search “CMD” into your search bar and click onto the application.
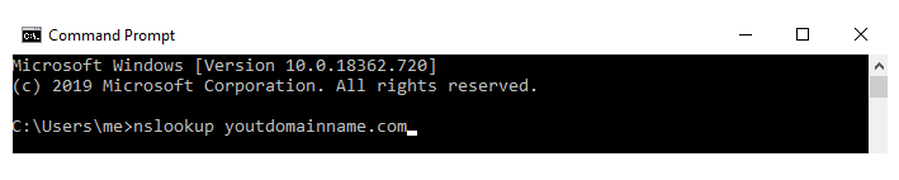
After clicking into it, please type the following command; ns.lookup (your domain.ie) and hit enter.
Or you could typ in Ping (your domain.ie) and hit enter
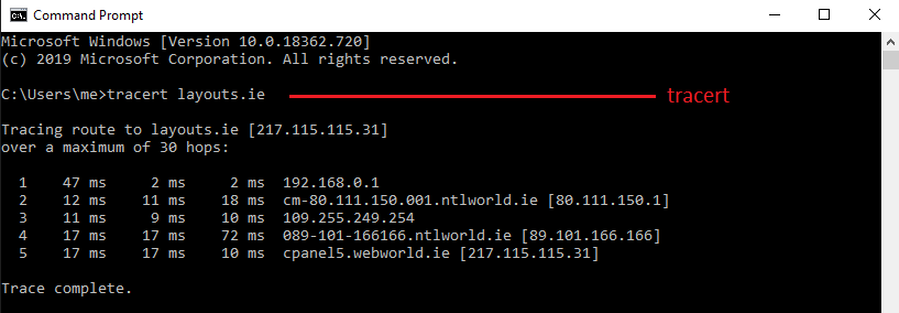
Or another option is to type in traceroute -I -e (your domain.ie)
Trace (also known as Traceroute or TRACERT in Windows) is a utility that traces a the route that IP (Internet Protocol) packets take from your computer to an internet host, showing how many hops the packet requires to reach the host and how long it takes to reach each router. If you’re visiting a Web site and pages are appearing slowly, you can use traceroute to figure out where the longest delays are occurring.
Please remember put just a tracert command in Windows
That’s been it, I hope I have explained the basics of DNS Propagation or most commonly called as updating DNS records.
If you ever do need your DNS records updated please pop us in an email to support@webworld.ie and we will change them for you!
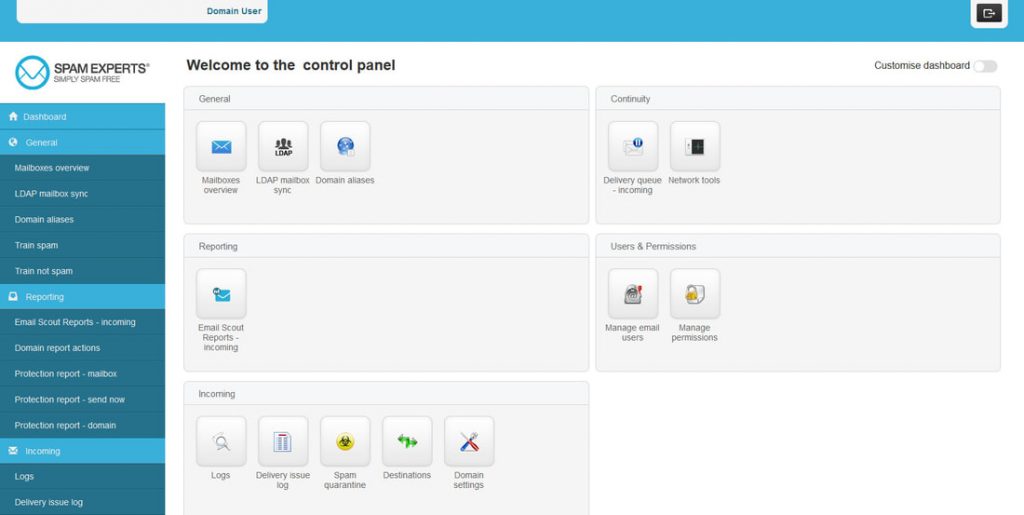
SpamExperts inbound anti-spam system offers full inbox protection for millions of emails every second of the day, and increases security at the network level. In this way, end-users are offered maximum control and email continuity, with the perk of saving significant human and network resources.
SpamExperts unmatched spam intelligence is a direct result from processing millions of emails every second of the day. Incoming email filters have an industry leading rate of nearly 100% filtering accuracy with close to 0 false positives.
Filter Quality and Efficiency. SpamExperts applies its self-learning smart technologies to eliminate spam mail before it reaches your network.
Incoming Email Filtering. Improve employee productivity and be in full control of your email flow
Secure your network from spam, virus, phishing and malware attacks. SpamExperts applies its self-learning smart technologies to eliminate spam mail before it reaches your network.
Increased email continuity. An extra protective layer of incoming filter to your email flow and infrastructure adds redundancy and continuity to your email delivery process. When the destination mail server is unreachable, SpamExperts filtering systems queue inbound email
Improve resource efficiency. With our highly efficient first-level incoming filter defence running in front of your mail infrastructure, you will no longer need to deal with vast amounts of incoming email spam.
INCREASED EMAIL CONTINUITY Improve resource efficiency your network from spam, virus, phishing and malware attacks SpamExperts applies its self-learning smart technologies to eliminate spam mail before it reaches your network.
SpamExperts applies continuous improvements in secure data collection and analyses, instantly detecting new patterns and identifying derails. That accumulated intelligence is shared in real-time with all other users worldwide, assuring timely protection against new threats
FREE SPAMEXPERTS WITH OUR CLOUD HOSTING PLANS 3 & 4: SHARED HOSTING + SPAM EXPERTS: Hosting Plan 1 : SpamExperts – €59/year Hosting Plan 2 : SpamExperts – €59/year Hosting Plan 3 : Free SpamExperts Filtering Hosting Plan 4 : Free SpamExperts Filtering
SSD HOSTING +SPAM EXPERTS:
Hosting Plan 1 : SpamExperts – €59/year Hosting Plan 2 : Free SpamExperts Filtering Hosting Plan 3 : Free SpamExperts Filtering Hosting Plan 4 : Free SpamExperts Filtering
*Offer runs from 17th of November 2023 to 1st of December 2023
SECURE YOUR NETWORK FROM SPAM, VIRUS, PHISHING AND MALWARE ATTACKS Detect new spam and malware outbreaks immediately. Improve resource efficiency your network from spam, virus, phishing and malware attacks SpamExperts applies its self-learning smart technologies to eliminate spam mail before it reaches your network.
SpamExperts applies continuous improvements in secure data collection and analyses, instantly detecting new patterns and identifying derails. That accumulated intelligence is shared in real-time with all other users worldwide, assuring timely protection against new threats.
If you have any questions please feel free to email us at support@webworld.ie and we will be glad to help you out.
SpamExperts inbound anti-spam system offers full inbox protection for millions of emails every second of the day, and increases security at the network level.